Build your first ACUITy Application
Follow the instructions for downloading and installing ACUITy.
Create a New ACUITy application
Follow the instructions for
creating a new ACUITy-powered application. For the purposes of this tutorial, when you run createNewProject.bat, give your application the project name: Course101Website.
Create a sample MySQL database to use for this tutorial
To create and populate a database for this tutorial:
- Install MySQL server from mysql.com website. Follow instructions provided with the install to set-up the database server.
- From SQL shell create the database by executing:
mysql> CREATE DATABASE course101;
- Select your newly created DB:
mysql> USE course101;
- Download and execute the file acuity_tutorial_tables.sql to create and populate tables used in the tutorial:
mysql> source acuity_tutorial_tables.sql;
Extend the Application Interactively
Login to your New ACUITy Application
- Login to Course101Website using any user ID.
- The frame selector presentation object is displayed. Click in the drop-down list to "Create New Instance"
- You will see that the application is initially devoid of functionality,
aside from the
Application Editor tab that appears at the top of the screen. Click on it.

Create the Professor Home vantage:
- In the presentation object labeled "Content Only," click on "Containment Only" (this is optional, but filters the Properties of AppModel Frame table to display concepts with containment properties only, for clarity).
- In the table labeled "Properties of AppModel Frame" you will see that the application currently only contains a vantage selection object.

- Click the icon
 for
"nl" (new line) anywhere in the Properties of AppModelFrame table.
- In the "Property" column of the new line, click on the drop-down list and select "hasVantage".
- In the "Restriction Type" column, click on "SomeValuesFrom".
- In the "Restricted To" Click "Create New Class".
- The ACUITy editor will now display the class editor. In the Class Hierarchy presentation object, click on "Vantage".
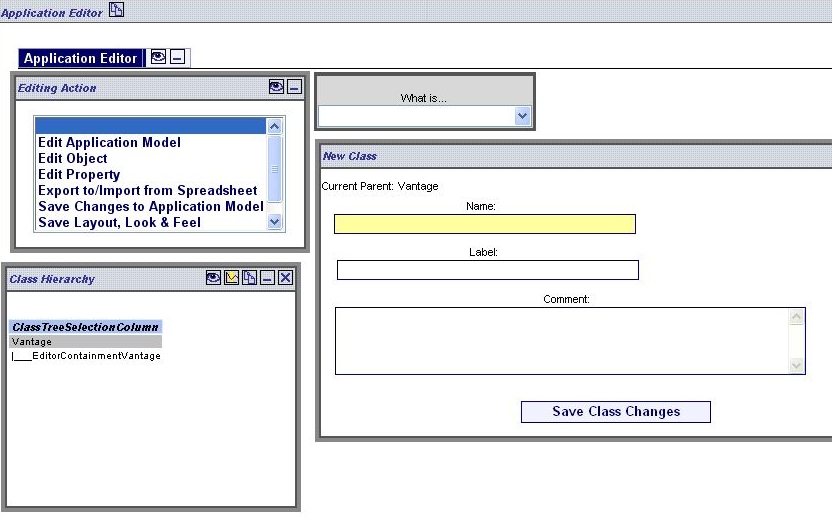
- In the New Class presentation object, enter a name (with no spaces) and label (spaces ok). In this example, we'll use the name "ProfessorHomeVantage" and label "Professor Home " (note that label is at present a required field, which is a known bug). Click Save Class Changes.
- The Professor Home vantage will appear in the list of vantage choices in the vantage selection presentation object. If you click on this vantage, you will see that it is empty. The next step will be to add presentation objects to the vantage.
Create the Student Grade Simple Data Table
- In the table labeled "Properties of AppModelFrame", drill down on (click the magnifying glass icon in "dd" column next to) <hasVantage> someValuesFrom <ProfessorHomeVantage>.
Note that if you drill down on a concept by clicking on the magnifying glass icon, you can view the properties of higher-level concepts again by selecting the higher-level concept in the presentation object labeled "Higher-Level Concepts".
- In the table labeled "Properties of ProfessorHomeVantage", select <Property> containsPresentationObject <RestrictionType> someValuesFrom <Restricted To> Create New Class.
- In the Class Hierarchy presentation object, click "SimpleDataTable".
- In the New Class presentation object, enter a name "StudentGradeTable" and label "Student Grades". Click Save.
- In the presentation object labeled "Content Only" select "All Properties" (because now we need to specify properties other than containment, so we need to unfilter the table labeled "Properties of ProfessorHomeVantage").
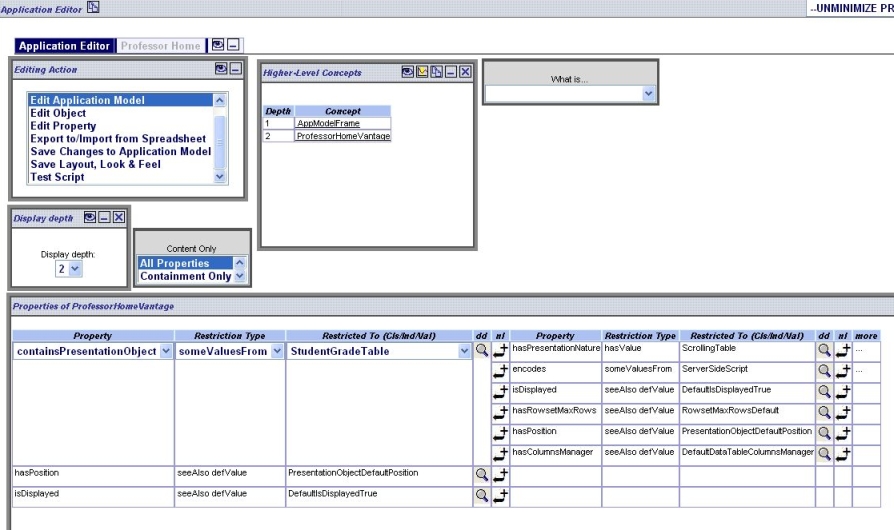
- Insert line in table by clicking on a "nl" icon
 furthest to the right of "StudentGradeTable" (i.e. to add a new property to Student Grade Table)
- The ACUITy Editor inserts a new line in the table labeled "Properties of ProfessorHomeVantage. To the right of
"StudentGradeTable", select: <Property> "encodes" <Restriction> "hasValue" <RestrictedTo> "Create New Instance".
- The ACUITy Editor will display the instance editor. In the class hierarchy presentation object select SQL Statement
- In the New Individual presentation object enter the name: "GetStudentGrades" (please note that this name must be used to match the template we will use later in the session)
- Click "Save Changes to Individual."
- The table labeled "Properties of ProfessorHomeVantage" will be displayed again.
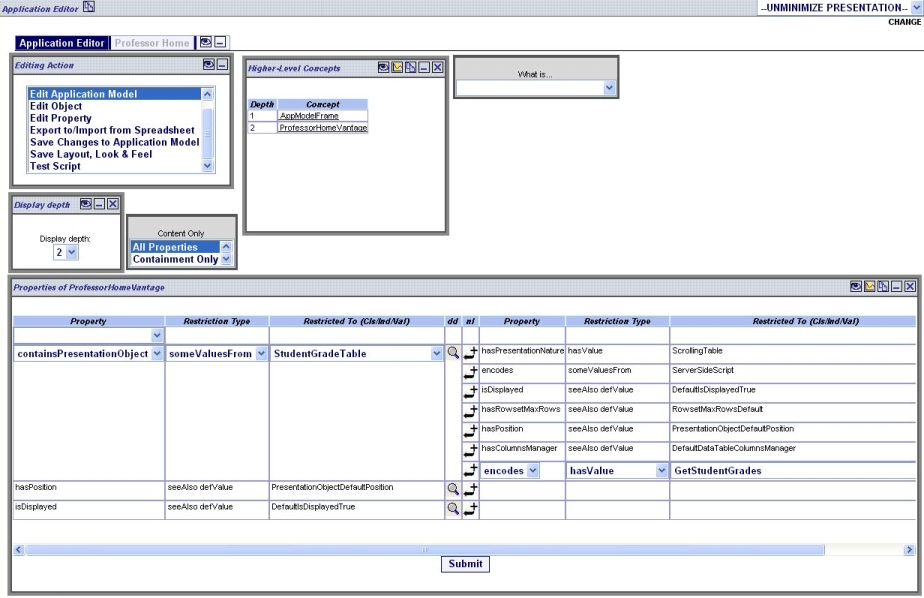
- Drill-down on the concept "GetStudentGrades" (i.e. click on the magnifying glass
 immediately to the right of it)
- The ACUITy Editor will display a table labeled "Properties of GetStudentGrades", select <Property> dbSQLString <Restricted To> "SELECT * FROM acuity_student_grade order by date". Click Submit.
- Insert a new line in the table labeled "Properties of GetStudentGrades" (click on the "nl" icon).
- Select <Property> hasDBconnection <RestrictedTo> TutorialDBConnection.
- Drill down on the properties of TutorialDBConnection by clicking on the magnifying glass immediately to the right.
- Edit the properties: db ConnectionString, dbDriverString, dbLoginString and dbPasswordString to match the access information for the database server where you created the course101 database.

- Click on the "Professor Home" tab to view your new Student Grade Table.
Save Model Changes
- Click on the "Application Editor" tab.
- In the "Editing Actions" presentation object, click on "Save Changes to Application Model".
- For now, there's no need to change the save location or file name; click the "Save Changes to Application Model" button.
Create Default Layout, Look and Feel
- Click on the "Professor Home" tab.
- In the Professor Home vantage, click on the eyeball icon on the Student Grades table. This will display a form for changing editable parameters of the presentation object - it will hang off the bottom of the Student Grade Table - if you don't see it, try scrolling down your browser window.
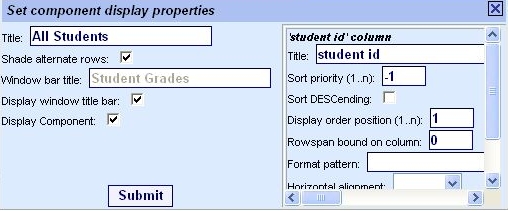
- Check "Shade alternate rows"; enter title: "All Students". Click "Submit" in the parameter form - you will now see that alternate rows in the table are shaded and the title appears above the table.
- Re-position by clicking on the window title bar at the top and dragging and dropping it to another location on the display. Resize the Student Table by clicking on the gray border of the table and dragging the pointer to the place you want the edge to end up (resizing will happen as soon as you release the mouse).
- Click on the "Application Editor" tab. In the Editing Action presentation object, click "Save Layout, Look & Feel" and click "Save Defaults". This will save the default layout and presentation parameters of the application. If you close your browser and start up a new session, you will see that the application retains the alternate row shading, new title and revised positioning.
Learn User Preferences:
- Click the "Professor Home" tab.
- In the Professor Home vantage, click on the eyeball icon in the Student Grade Table.
- Change the title of Column one from "student id" to "ID".
- Click the "save" icon in the upper right hand corner of the screen. Give the Frame some name, e.g. "Frame 1" and click Save.
- Close your browser, bring up a new browser and login to your application with the same user id. This time, select "Frame 1" in the Frame selector. You will see that the column name preference has been saved for that Frame. If you select "Create new instance", you will see that the layout and properties of the table revert to the defaults you saved in the application editor.
Restrict Customization:
- In the application editor, drill down on (click on the magnifying glass to the right of) Student Grade Table.
- Insert an additional property row (click on an "nl" icon) in the table labeled "Properties of Student Grade Table".
- Select <Property> alternateRowShading <Restriction> has Value <Restricted to> True.
- Save changes to the application model (select "Save Application Model" in the Editor Actions presentation object).
- Close your browser, bring up a new one and login to a new instance of your application. If you click on the eyeball icon on the Student Grade table, you will see that alternate row shading is no longer editable.
Note: The Application Editor will typically be removed by developer once the application has been developed and before deployment. Thus, there will be a clearer delineation between the parameter setting and saving capabilities of the application user and the application developer in a production application than in this tutorial.
Extend the Application via Design Patterns and Imports
- Download the CSV file templates from
...Documentation/Course101Tutorial and place them in the directory: <path to your ACUITy directory>/Course101Website/Application Ontologies.
Note: This section of the tutorial requires that you download two design templates: Phase II and Phase III, available in the
...Documentation/Course101Tutorial, either
in your ACUITy installation or on sourceforge. You will see that there is also a Phase I tempate available; Phase I simply implements the Professor Home vantage and Student Grades simple data table we just created interactively above. If you want to re-create those in a new application without all the work, you can import PhaseI.csv following the instructions below. Just be sure to edit
PhaseI.csv first and enter the correct DB Connection property values in rows 9, 11 and 12.
- Click on the "Application Editor" tab.
- In the Editor Actions presentation object, select
"Export to, Import From Spreadsheet".
- Select template PhaseII.csv in the presentation object labeled "Import File Selector".
- Preview the results of importing the CSV file and click "Import".
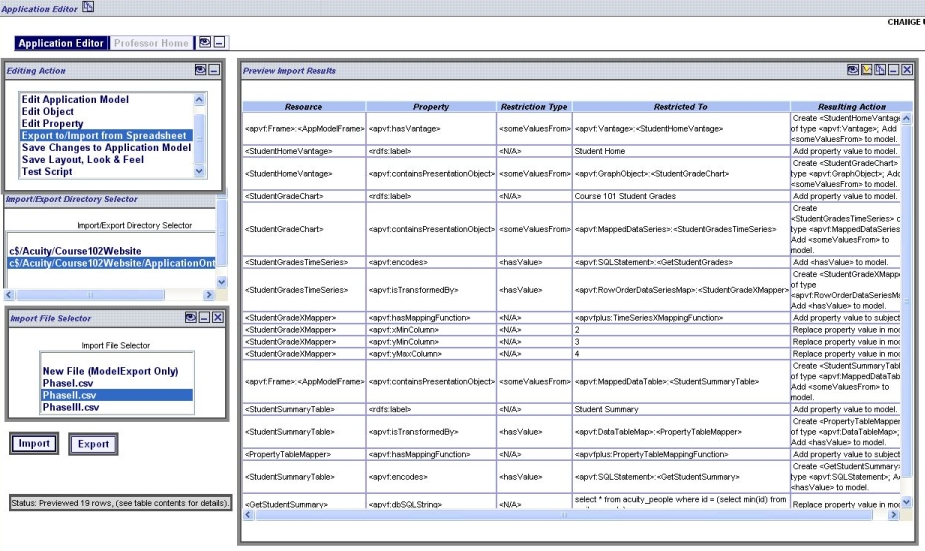
- A new vantage will appear called "Student Home", which will contain a chart called Student Grade Chart. The Student Summary table will also be displayed. Note that the Student Summary Table is attached to the Frame not a particular vantage, so it will be displayed regardless of what vantage the user displays (also note that the Student Summary Table provides an example of how to use a Java script as a mapping function).
- In the Student Home vantage, you will notice that the default size for the Course 101 Student Grades chart is arguably too small, so make it larger, grab the corner of the presentation object and drag it to the position you want. Then click the eyeball icon in the upper right and, in the parameters form, that is displayed under the chart, click submit. The chart will then resize. Also note that the chart and the Student Summary table are based on a query that selects the minimum student ID rather than all students.
A Brief Look at Using Scripts
- Import application template PhaseIII.csv with examples into your application in the same way you imported
PhaseII.csv. This template:
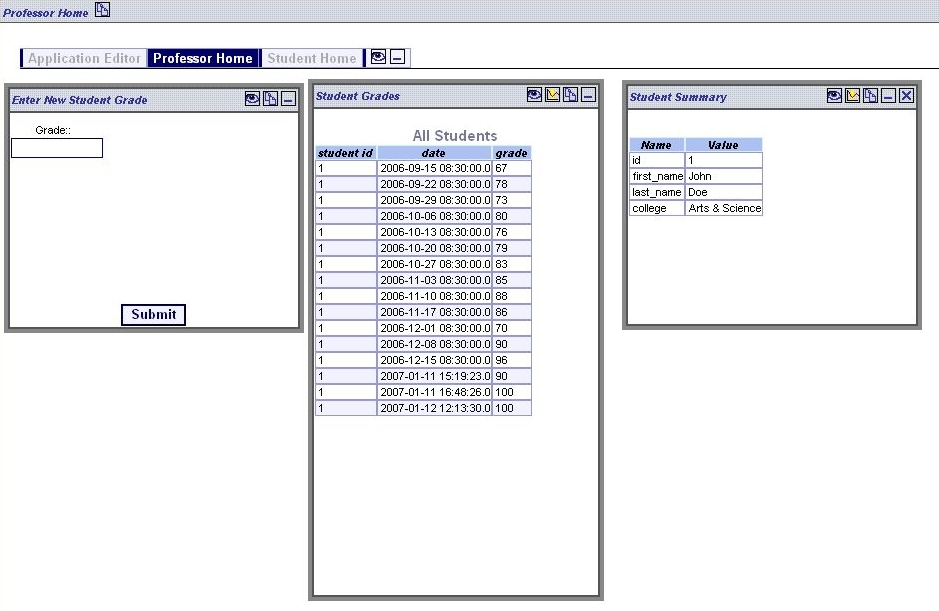
- Uses missing properties and anchors to refine an SQL query to populate a presentation object. In this case, a presentation object will appear asking the user to select a student ID from a drop-down list. When the user makes a selection (John Doe has the most data in our sample database), the query GetStudentGrades will filter on student ID. If you view the Student Grade Table and Student Grade Chart, you will see that they only display the grades for the selected student. Because we're using the student selector presentation object as an example of using missing properties, it will disappear from the display once a selection has been made and will reappear at the beginning of a new session. Arguably, you may want the student selector to stick around,
particularly for our professor, who presumably would want to select additional students in a single session. We haven't done this in our tutorial example, but you certainly could in a real application.
- Uses a Student Grade Input Form in the Professor Home vantage to update the sample DB with new grade data using a SQL update script. In this example, simply enter a new grade and click submit; the grade is entered and associated with the current date-time stamp.
What Next?
This tutorial gives you a brief introduction to ACUITy and some examples to help you get started. We plan to expand on this tutorial to provide additional examples and templates that will implement additional types of functionality (input forms, documents, external applications, drill-down links and so on). In the mean time, you may find it useful to download our Showcase sample application and inspect its application model (either in its interactive
Application Editor tab (probably the easiest way) or by viewing its AppModel.owl file in a separate ontology viewer) to see how different functionalities are modeled.
Copyright 2007 General Electric Company
Revised
01/12/2007


