Downloading and Installing as an ACUITy Developer (Extending
ACUITy)
Required Software
Development Environment
The ACUITy team is developing using the Eclipse Java
Development Environment (great
environment!). The ACUITy Developer download (AcuitySource.zip) includes Ant build scripts for building the ACUITy
environment and for creating, building and deploying ACUITy-powered applications.
While use of Eclipse is not necessary, these instructions are specific to
Eclipse. If you are using
some other IDE, you’ll have to alter the process as appropriate. (And
please share what you did.)
J2SE JDK
A Java environment is needed, at least version 5.0 for Tomcat 5.5 and at least SDK version 1.2 for Tomcat 4.1.
For other application servers other requirements may apply.
To install a JDK, follow instructions at
http://java.sun.com/javase/downloads/index.jsp.
Apache Tomcat
To-date, ACUITy has been tested on versions 5.5 and 4.1. We have not had
success getting it to run with version 5.0. To install Tomcat, follow the instructions at
http://tomcat.apache.org/.
ACUITy applications have also been deployed on various versions of JBoss.
Apache Ant
If you have Eclipse installed, you probably already have Ant. The path will
point to a subdirectory of your eclipse plugins directory, e.g., .../eclipse/plugins/org.apache.ant_1.6.2.
If the environment variable "ANT_HOME" is set to be the path to the Ant
installation you will not need to edit the "createNewProject.bat" and "buildProjectWar.bat"
during the installation of ACUITy and creation of a new application.
To install Ant, follow instructions at
http://ant.apache.org/.
Note: When updating to a new version of ACUITy, applications will
need to have the old ACUITy jar files removed manually from the "...lib/acuityLib"
directory.
To set up the ACUITy Development Environment in
Eclipse
There are two ways to obtain the ACUITy development
environment from SourceForge.
-
Download AcuitySource.zip from the SourceForge download area
and use to populate an Eclipse project.
-
Create an Eclipse project directly from the ACUITy project CVS repository.
By Using AcuitySource.zip
-
Create a new Java Project in Eclipse. This document assumes
the project name is "ACUITy".
-
Unzip AcuitySource.zip into the new Eclipse workspace project
directory, e.g., "...../workspace/ACUITy".
By Connecting Directly to the ACUITy CVS Repository
-
Open the CVS Repositories view in Eclipse and create a new
repository connection by clicking on the "Add CVS Repository" icon.
-
Provide the connection properties:
-
Check "Use the repository identification string as the label
-
Connection type: this will depend on your network environment
-
User: your SourceForge userid
-
Password: your SourceForge password
-
Host: acuity.cvs.sourceforge.net
-
Repository path: /cvsroot/acuity
-
Check "Use default port"
-
Once the connection to the repository is opened, expand by clicking on the
"plus" icon: ...->HEAD->Acuity
-
Right-click on "Acuity" and select "Check Out". This will create your ACUITy
project
-
Make the ACUITy project a Java-natured project. This can be done by adding
the following within the projectDescription tag in the ".project" file in the
ACUITy project root directory:
<buildSpec>
<buildCommand>
<name>org.eclipse.jdt.core.javabuilder</name>
<arguments>
</arguments>
</buildCommand>
</buildSpec>
<natures>
<nature>org.eclipse.jdt.core.javanature</nature>
</natures>
Finishing Installation
Regardless of which of the above methods you use to obtain the project
content (downloading AcuitySource.zip or checking out of CVS), continue with the steps below.
-
Refresh the ACUITy project resources. (In the Eclipse Package
Explorer view, right-click on ACUITy and select Refresh.)
-
In the Eclipse Java view, right-click on the project name and select
Properties->Java Build Path->Source. Add the folders ACUITy/AcuityCore/src,
ACUITy/AcuityInterface/src, and ACUITy/ApplicationUtilities/src. Answer yes to
any prompts. Then change the Default output folder to "ACUITy/classes".
-
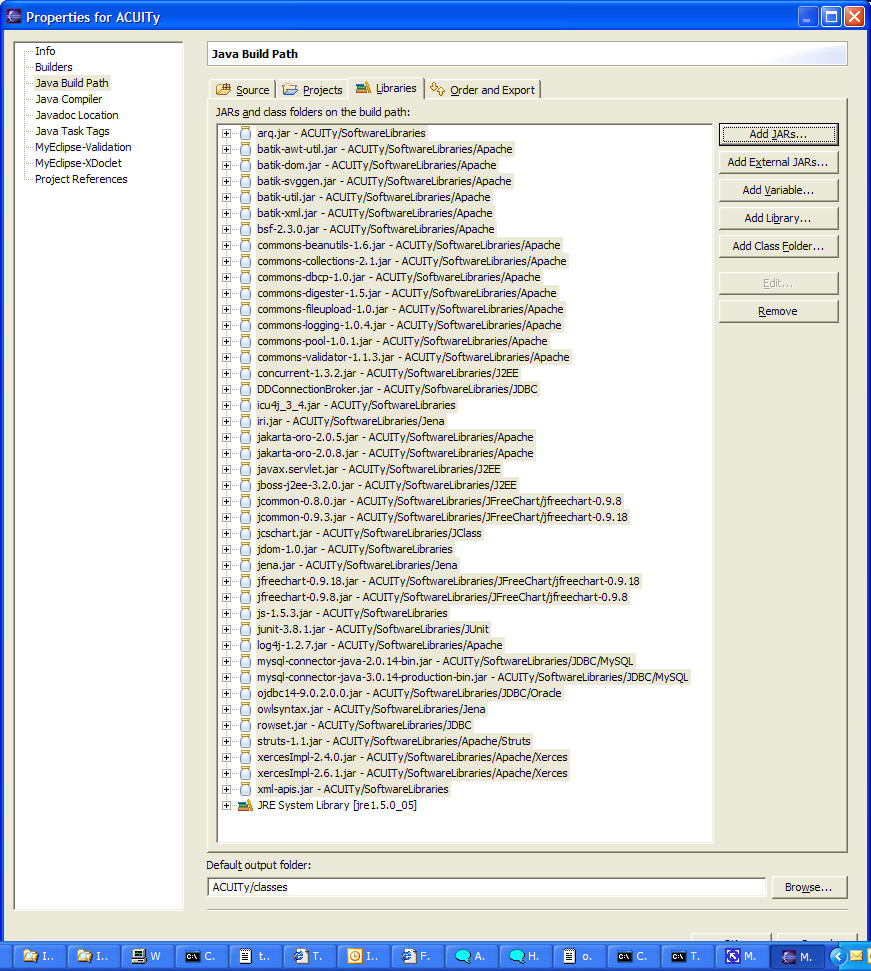
In the Libraries tab (Properties->Java Build Path->Libraries), add the jar
files in the ACUITy/SoftwareLibraries folder. The result should look something
like this:

-
Run the Ant build file build.xml with target "buildTemplateZIP" to create the ApplicationUtilities jar,
ACUITyCore jar, and the AcuityInterface jar
files and create the template file (template.zip) required for creating ACUITy
applications.
Congratulations! You now have an ACUITy
developer’s environment and are ready to
create an ACUITy-powered
application.
Copyright 2007 General Electric Company
Revised01/22/2007
